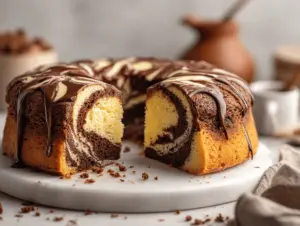
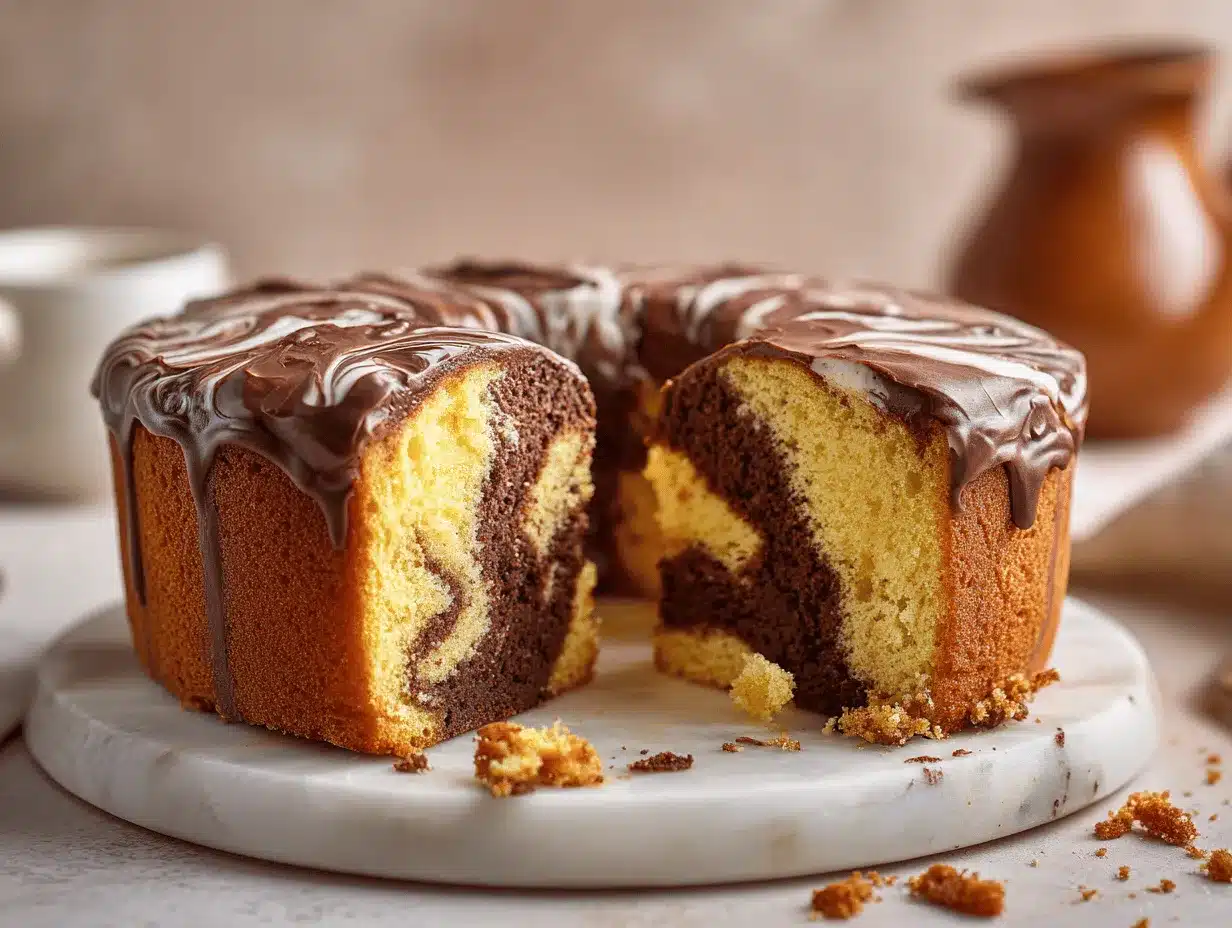
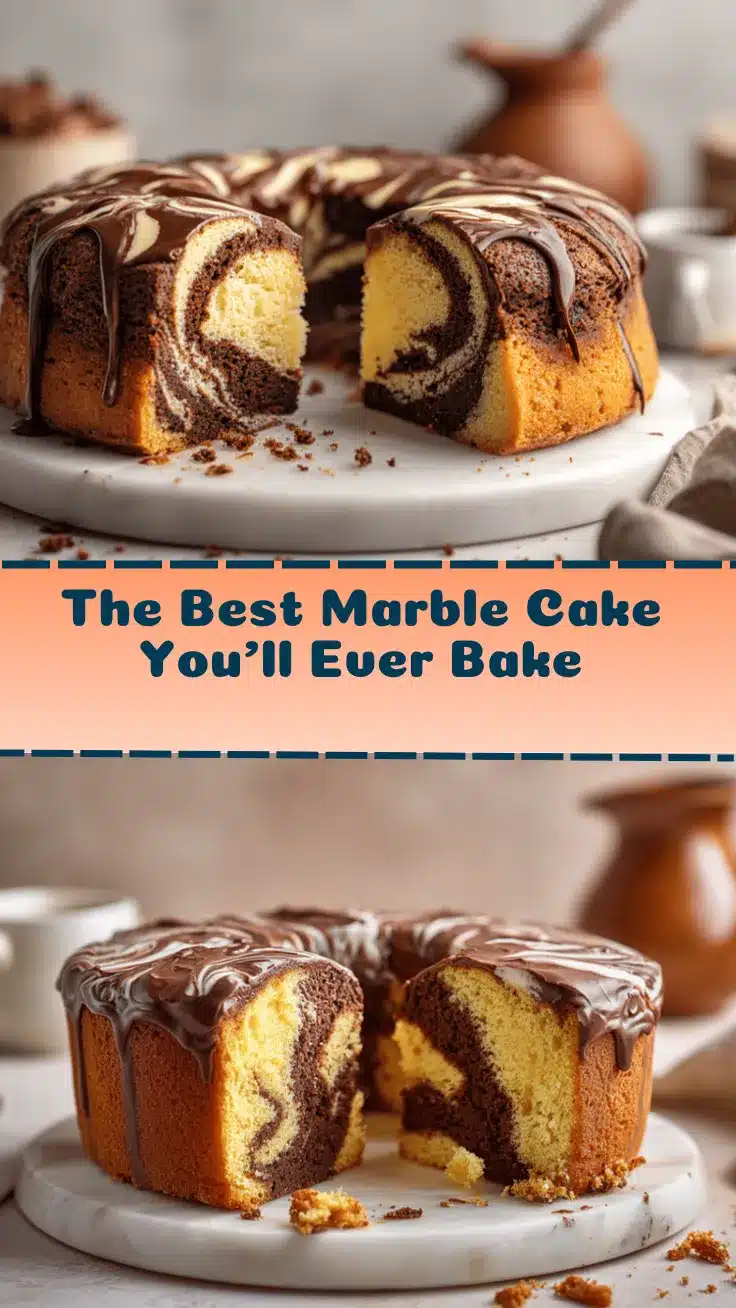
The first time I pulled a marble cake out of my oven, the swirl of chocolate and vanilla looked almost too good to slice—almost. The aroma of buttery cake mixed with cocoa had my family hovering around the kitchen, waiting for the first piece. If you’re searching for a marble cake recipe that’s moist, simple, and perfect for birthdays, you’re in the right place. This cake is everything you want in a celebratory treat: soft crumb, rich flavor, and that wow-factor swirl. I’ve tinkered with this recipe so many times (think birthday after birthday and lots of “just because” weekends) to make sure it’s foolproof and crowd-pleasing every single time.
Marble cake isn’t just a pretty face—it’s a classic for a reason. The best marble cake delivers the nostalgia of grandma’s kitchen but with a modern, easy-to-follow twist that fits into real life. When you want to impress your guests or just treat yourself, this recipe comes through. I love that it only requires pantry staples, so you don’t need a special trip to the store. Whether you’re a beginner or a seasoned baker, this marble cake is forgiving, straightforward, and genuinely fun to make (the swirling step always brings out my inner artist!).
As someone who’s baked dozens of cakes over the years, I know marble cake can sometimes be dry or bland. Not here. This version is super moist, thanks to a few key ingredients and techniques I’ll share below. Trust me, if you want a marble cake that gets rave reviews at birthdays—or any day—this is the one to bookmark. Let’s get swirling!
Why You’ll Love This Marble Cake Recipe
- Quick & Easy: From start to finish, you’ll have a gorgeous cake ready in just about 1 hour. No complicated steps or baking gymnastics required.
- Simple Ingredients: Everything you need is probably in your pantry right now—flour, sugar, butter, cocoa powder, and a few basics. No wild goose chases for obscure ingredients.
- Perfect for Birthdays: Marble cake is a timeless birthday favorite. It’s the best of both worlds—chocolate and vanilla—so nobody has to choose sides.
- Crowd-Pleaser: I’ve served this to picky kids, dessert-loving adults, and even my tough-to-please grandma. Every time, the plate is clean and someone asks for the recipe.
- Unbelievably Delicious: The combination of moist crumb, rich cocoa, and buttery vanilla is pure comfort. It’s the kind of cake that makes you close your eyes and sigh after each bite.
What sets this marble cake recipe apart is the little details. I use room temperature ingredients and cream the butter and sugar just right for maximum fluffiness. The chocolate swirl isn’t just cocoa powder tossed in—it’s a deeply flavored chocolate paste that gives the cake extra richness. I’ve learned (sometimes the hard way!) that not overmixing the batter keeps the crumb tender. And honestly, the swirling step is just plain fun. Every cake comes out with its own unique pattern—no two are exactly alike.
This cake is more than just a dessert; it’s a centerpiece for any occasion. It’s perfect for birthdays, yes, but also for holidays, potlucks, or those Sunday afternoons when you want something special without a lot of fuss. The flavor is classic, but the method is streamlined for busy bakers. Plus, it’s just as good the next day (if it lasts that long!).
If you’re looking for a marble cake recipe that’s easy, dependable, and downright irresistible, this is it. I’ve baked it for celebrations big and small, and it never disappoints. Trust me, you’ll be making excuses to whip this one up, birthday or not!
What Ingredients You Will Need
This marble cake recipe is all about simple, wholesome ingredients that come together for a cake that’s both eye-catching and delicious. Here’s everything you’ll need to create the perfect swirl:
- For the Vanilla Batter:
- 2 cups (250g) all-purpose flour (gives the cake its structure; I like King Arthur or Bob’s Red Mill)
- 1 1/4 cups (250g) granulated sugar (for sweetness and moisture)
- 1/2 cup (113g) unsalted butter, softened (adds richness and flavor)
- 1/2 cup (120ml) vegetable oil (keeps the cake super moist—even days later!)
- 3 large eggs, room temperature (binds the batter and makes it fluffy)
- 1 cup (240ml) whole milk, room temperature (for a tender crumb; feel free to swap with almond or oat milk for dairy-free)
- 2 teaspoons vanilla extract (pure vanilla gives the best flavor—don’t skimp!)
- 2 teaspoons baking powder (helps the cake rise)
- 1/2 teaspoon baking soda (for extra lift and softness)
- 1/2 teaspoon salt (balances the sweetness)
- For the Chocolate Swirl:
- 1/3 cup (40g) unsweetened cocoa powder (Dutch process gives a darker color, but natural is great too)
- 1/4 cup (60ml) hot water (to bloom the cocoa for the richest flavor)
- 2 tablespoons (25g) granulated sugar (helps the chocolate stand out)
- Optional Toppings:
- Powdered sugar (for dusting—makes it look bakery-fancy!)
- Chocolate ganache or glaze (if you want extra decadence)
- Fresh berries (for a pop of color and freshness)
Ingredient Tips: Use room temperature eggs and dairy for the fluffiest texture. If you need a gluten-free version, swap all-purpose flour for a 1:1 gluten-free blend (like Cup4Cup or King Arthur’s). For a dairy-free cake, use vegan butter and plant-based milk. If you’re out of vegetable oil, melted coconut oil or even light olive oil works in a pinch—just note the flavor shift.
One more thing I’ve learned: always sift your cocoa powder to avoid lumps in the chocolate swirl. And if you want the chocolate flavor to really shine, blooming the cocoa in hot water is a game-changer (a trick I picked up after a few less-than-chocolatey cakes!).
Equipment Needed
You don’t need a fancy kitchen to make this marble cake recipe shine. Here’s what you’ll want to have on hand (plus a few budget-friendly tips!):
- 9×5-inch (23x13cm) loaf pan or 8-inch (20cm) round cake pan (both work—just adjust baking time slightly)
- Mixing bowls (one large for batter, one medium for chocolate swirl)
- Electric mixer (handheld or stand mixer makes creaming butter effortless; a sturdy whisk works too, but your arm will get a workout!)
- Measuring cups & spoons (for accuracy—baking is a science, after all)
- Rubber spatula (for scraping every bit of batter and swirling the magic)
- Toothpick or skewer (for testing doneness and creating that signature swirl)
- Parchment paper (for easy removal and less mess—trust me, it’s worth it)
If you don’t have a loaf pan, use a bundt pan or even muffin tins for individual marble cakes (just watch the bake time). I’ve used metal and glass pans; both work, but metal gives a slightly crisper edge. Don’t skip greasing your pan—nothing’s worse than half your cake stuck behind! And if you’re using your grandma’s old beaters like I sometimes do, make sure they’re clean and rust-free for best results.
Preparation Method
-
Prep Your Pan & Ingredients (10 minutes):
- Preheat your oven to 350°F (175°C).
- Grease a 9×5-inch (23x13cm) loaf pan and line with parchment paper, leaving a slight overhang for easy lifting.
- Set out eggs, milk, and butter so they reach room temperature—this makes a huge difference in texture!
-
Bloom the Cocoa (5 minutes):
- In a medium bowl, whisk together 1/3 cup (40g) cocoa powder, 2 tablespoons (25g) sugar, and 1/4 cup (60ml) hot water until smooth and glossy. Set aside to cool slightly.
- This step brings out the deep chocolate flavor—don’t skip it!
-
Cream Butter, Oil, and Sugar (3 minutes):
- In a large mixing bowl, beat 1/2 cup (113g) unsalted butter and 1 1/4 cups (250g) sugar together until pale and fluffy (about 2-3 minutes).
- Scrape down the sides—no one likes a lumpy cake.
- Add 1/2 cup (120ml) vegetable oil and mix until combined.
-
Add Eggs & Vanilla (2 minutes):
- Beat in 3 large eggs, one at a time, mixing well after each addition.
- Stir in 2 teaspoons vanilla extract.
- The batter should look creamy and a bit glossy.
-
Mix Dry Ingredients (2 minutes):
- In a separate bowl, whisk together 2 cups (250g) flour, 2 teaspoons baking powder, 1/2 teaspoon baking soda, and 1/2 teaspoon salt.
- Don’t skip sifting if your flour looks clumpy—it really does help!
-
Combine Wet & Dry Ingredients (3 minutes):
- Add the dry mixture to the wet mixture in three parts, alternating with 1 cup (240ml) milk. Start and end with flour.
- Mix gently until just combined—overmixing will make the cake tough.
- Batter should be smooth but not runny.
-
Create the Chocolate Swirl (2 minutes):
- Scoop out about 1 cup of the vanilla batter and mix it into the bowl with bloomed cocoa until fully combined.
- You should have one bowl of vanilla batter and one smaller bowl of chocolate batter.
-
Layer & Swirl (5 minutes):
- Pour half the vanilla batter into the prepared pan. Dollop half the chocolate batter on top.
- Add the rest of the vanilla, then top with remaining chocolate batter.
- Use a skewer or knife to gently swirl the batters together. Go for an “S” shape—don’t overdo it or the colors will blend!
-
Bake (45-55 minutes):
- Bake for 45-55 minutes, or until a toothpick comes out with a few moist crumbs (not wet batter).
- If the cake is browning too quickly, tent with aluminum foil after 35 minutes.
- Your kitchen should smell amazing—like vanilla, butter, and chocolate had a party.
-
Cool & Unmold (15 minutes):
- Let the cake cool in the pan for 10-15 minutes, then use the parchment overhang to lift it out.
- Cool completely on a wire rack before slicing for the cleanest swirls.
- If you slice too soon, the cake might be a little crumbly (I’ve done it—still tastes great, but not as pretty!).
Prep Note: If you’re making this for a birthday, the cake can be baked a day ahead—just wrap tightly and store at room temp. For a little extra flair, top with a dusting of powdered sugar or a drizzle of chocolate ganache once cooled.
Cooking Tips & Techniques
Years of marble cake experiments have taught me a thing or two. Here’s what really makes a difference for the best marble cake recipe:
- Room Temperature Ingredients: Always start with room temp eggs, butter, and milk. This helps everything blend smoothly and gives your cake a finer crumb. Cold ingredients can make the batter lumpy or cause it to bake unevenly.
- Don’t Overmix: Once you add the flour, mix just until combined—overmixing can make the cake tough. I learned this the hard way after a few chewy disasters! Gently fold for a tender crumb.
- Bloom the Cocoa: Mixing cocoa powder with hot water “blooms” it, releasing deeper, more intense chocolate flavor. If you skip this, the chocolate swirl might taste flat or slightly chalky.
- Swirl, Don’t Stir: For that classic marble effect, use a skewer or butter knife and make an “S” or figure-8 motion. Don’t go back and forth too many times or you’ll end up with a muddy color instead of pretty swirls.
- Check Early for Doneness: Ovens can be sneaky! Start checking for doneness at 45 minutes by poking the center with a toothpick. If it comes out clean or with just a few crumbs, you’re golden. Overbaking will dry it out.
- Let It Cool: Resist the urge to slice while it’s hot. The crumb sets up as it cools, so you’ll get cleaner, prettier slices (plus, the flavors meld even more).
If you’re multitasking (I mean, who isn’t?), set a timer for each step so you don’t forget to check on your cake. And if you find your cake tends to dome in the middle, try rotating the pan halfway through baking for a more even result. Baking is part science, part art—and marble cake is all about having fun with both!
Variations & Adaptations
One thing I love about this marble cake recipe is how easy it is to tweak for your tastes or dietary needs. Here are a few of my favorite variations:
- Gluten-Free Marble Cake: Swap the all-purpose flour for a gluten-free blend (make sure it has xanthan gum for structure). I’ve had great results with Cup4Cup and King Arthur’s 1:1 blends.
- Dairy-Free Marble Cake: Use vegan butter and your favorite non-dairy milk (like oat or almond). The cake stays moist and flavorful—I’ve even served it to friends who couldn’t tell the difference!
- Chocolate-Orange Twist: Add 1 tablespoon of finely grated orange zest to the vanilla batter for a citrusy kick. I tried this for a spring brunch and it was a total hit.
- Espresso Swirl: Dissolve 1 teaspoon instant espresso in the hot water before blooming the cocoa. The subtle coffee flavor makes the chocolate pop (and it’s so good with a cup of coffee).
- Mini Marble Cupcakes: Divide the batter between cupcake liners for adorable individual cakes. Reduce the bake time to 18-22 minutes.
- Nut-Free Option: This cake is naturally nut-free, but always check your cocoa and flour for cross-contamination if allergies are a concern.
Honestly, my favorite twist is the chocolate-orange version. It’s bright, fragrant, and feels extra special—perfect for when you want to change things up a bit! Don’t be afraid to play around and make this marble cake your own.
Serving & Storage Suggestions
Marble cake is a showstopper all on its own, but here’s how I love serving it (and keeping it fresh):
- Serving: Slice and serve at room temperature for the best flavor and texture. For parties, dust with powdered sugar or drizzle with a thin chocolate glaze. Add fresh berries for color—strawberries and raspberries look gorgeous against the swirled cake.
- Pairings: Serve with coffee, tea, or even a glass of cold milk. For birthdays, top with a scoop of vanilla or chocolate ice cream (trust me, it’s next-level good!).
- Storage: Store leftovers tightly wrapped at room temperature for up to 3 days. For longer keeping, refrigerate in an airtight container up to 5 days—just bring it to room temp before serving for best texture.
- Freezing: Marble cake freezes beautifully! Wrap slices or the whole cake tightly in plastic wrap, then foil. Freeze up to 2 months. Thaw overnight at room temp before serving.
- Reheating: If you want your cake slightly warm (so good with ice cream!), pop a slice in the microwave for 10-15 seconds. Just don’t overdo it, or it might dry out.
- Flavor Note: The flavors actually develop and meld after a day—so if you can resist, it’s even better the next day!
This marble cake is as versatile as it is beautiful—great for birthdays, brunches, or just because. Honestly, there’s never a bad time for a slice!
Nutritional Information & Benefits
Here’s a rough estimate for one slice (based on 12 servings):
- Calories: 290
- Fat: 14g
- Carbohydrates: 38g
- Protein: 4g
- Sugar: 20g
This marble cake recipe is a classic dessert, so it’s certainly a treat—but it’s made with real, simple ingredients. Eggs add protein, and milk brings calcium. If you use whole wheat flour for part of the recipe, you’ll get a fiber boost. It’s easy to adapt for gluten-free or dairy-free diets, and you can control the type of sugar or fat if you like. Just keep in mind, this cake contains wheat, eggs, and dairy (unless substituted). For me, enjoying a slice of homemade marble cake is about balance—delicious, mindful indulgence is part of my overall wellness philosophy!
Conclusion
There’s something magical about slicing into a marble cake and seeing those gorgeous chocolate and vanilla swirls. This marble cake recipe is my go-to for birthdays and celebrations, but honestly, I’ll make it anytime I need a little pick-me-up. It’s simple, reliable, and always a hit—plus, it’s a joy to bake (and eat!).
Feel free to tweak the flavors, swap ingredients, or add your own creative touch. I’d love to hear how you make this recipe your own—drop a comment below if you try it or have a favorite variation!
Thanks for baking along with me. I hope this marble cake brings as much joy to your kitchen as it does to mine. Happy swirling, and don’t forget to share your gorgeous cake on Pinterest or with your friends—because cake this pretty deserves to be shown off!
Frequently Asked Questions (FAQs)
How do I get a perfect swirl in my marble cake?
Use a skewer or knife and gently make S-shaped motions through the batter after layering vanilla and chocolate. Don’t over-swirl, or the colors will blend too much!
Can I make this marble cake recipe gluten-free?
Absolutely! Substitute a 1:1 gluten-free flour blend for the all-purpose flour. Make sure it contains xanthan gum for the best texture.
How should I store leftover marble cake?
Wrap the cake tightly in plastic wrap or keep it in an airtight container at room temperature for up to 3 days. For longer storage, refrigerate or freeze as described above.
Can I use this recipe for cupcakes or a bundt cake?
Yes! For cupcakes, fill liners 2/3 full and bake for 18-22 minutes. For a bundt pan, increase the bake time to 50-60 minutes and check with a toothpick for doneness.
Is it okay to add chocolate chips or nuts to the batter?
Definitely! Fold in up to 1/2 cup chocolate chips or chopped nuts after mixing the batter for extra texture and flavor.
Pin This Recipe!
Marble Cake Recipe: Best Moist & Easy Birthday Dessert Guide
- Total Time: 1 hour 10 minutes
- Yield: 12 servings 1x
Description
This moist and easy marble cake recipe features a beautiful swirl of chocolate and vanilla, making it the perfect crowd-pleasing dessert for birthdays and celebrations. With simple pantry ingredients and a foolproof method, it delivers a soft crumb and rich flavor every time.
Ingredients
- 2 cups (250g) all-purpose flour
- 1 1/4 cups (250g) granulated sugar
- 1/2 cup (113g) unsalted butter, softened
- 1/2 cup (120ml) vegetable oil
- 3 large eggs, room temperature
- 1 cup (240ml) whole milk, room temperature
- 2 teaspoons vanilla extract
- 2 teaspoons baking powder
- 1/2 teaspoon baking soda
- 1/2 teaspoon salt
- 1/3 cup (40g) unsweetened cocoa powder
- 1/4 cup (60ml) hot water
- 2 tablespoons (25g) granulated sugar
- Powdered sugar (optional, for dusting)
- Chocolate ganache or glaze (optional, for topping)
- Fresh berries (optional, for serving)
Instructions
- Preheat your oven to 350°F (175°C). Grease a 9×5-inch loaf pan and line with parchment paper, leaving an overhang for easy lifting. Set out eggs, milk, and butter to reach room temperature.
- In a medium bowl, whisk together cocoa powder, 2 tablespoons sugar, and hot water until smooth and glossy. Set aside to cool slightly.
- In a large mixing bowl, beat butter and 1 1/4 cups sugar together until pale and fluffy (2-3 minutes). Scrape down the sides. Add vegetable oil and mix until combined.
- Beat in eggs, one at a time, mixing well after each addition. Stir in vanilla extract.
- In a separate bowl, whisk together flour, baking powder, baking soda, and salt.
- Add the dry mixture to the wet mixture in three parts, alternating with milk. Start and end with flour. Mix gently until just combined.
- Scoop out about 1 cup of the vanilla batter and mix it into the bowl with bloomed cocoa until fully combined.
- Pour half the vanilla batter into the prepared pan. Dollop half the chocolate batter on top. Add the rest of the vanilla, then top with remaining chocolate batter. Use a skewer or knife to gently swirl the batters together in an “S” shape.
- Bake for 45-55 minutes, or until a toothpick comes out with a few moist crumbs. If browning too quickly, tent with foil after 35 minutes.
- Let the cake cool in the pan for 10-15 minutes, then use the parchment overhang to lift it out. Cool completely on a wire rack before slicing.
- Optional: Dust with powdered sugar, drizzle with ganache, or serve with fresh berries.
Notes
For best results, use room temperature eggs, butter, and milk. Don’t overmix the batter after adding flour to keep the crumb tender. Blooming the cocoa in hot water deepens the chocolate flavor. The cake can be made gluten-free or dairy-free with appropriate substitutions. Store tightly wrapped at room temperature for up to 3 days, or freeze for up to 2 months.
- Prep Time: 20 minutes
- Cook Time: 45-55 minutes
- Category: Dessert
- Cuisine: American
Nutrition
- Serving Size: 1 slice (1/12 of cake)
- Calories: 290
- Sugar: 20
- Sodium: 180
- Fat: 14
- Saturated Fat: 5
- Carbohydrates: 38
- Fiber: 1
- Protein: 4
Keywords: marble cake, birthday cake, easy cake recipe, moist marble cake, chocolate vanilla swirl, loaf cake, classic dessert, homemade cake, party dessert, kid-friendly cake