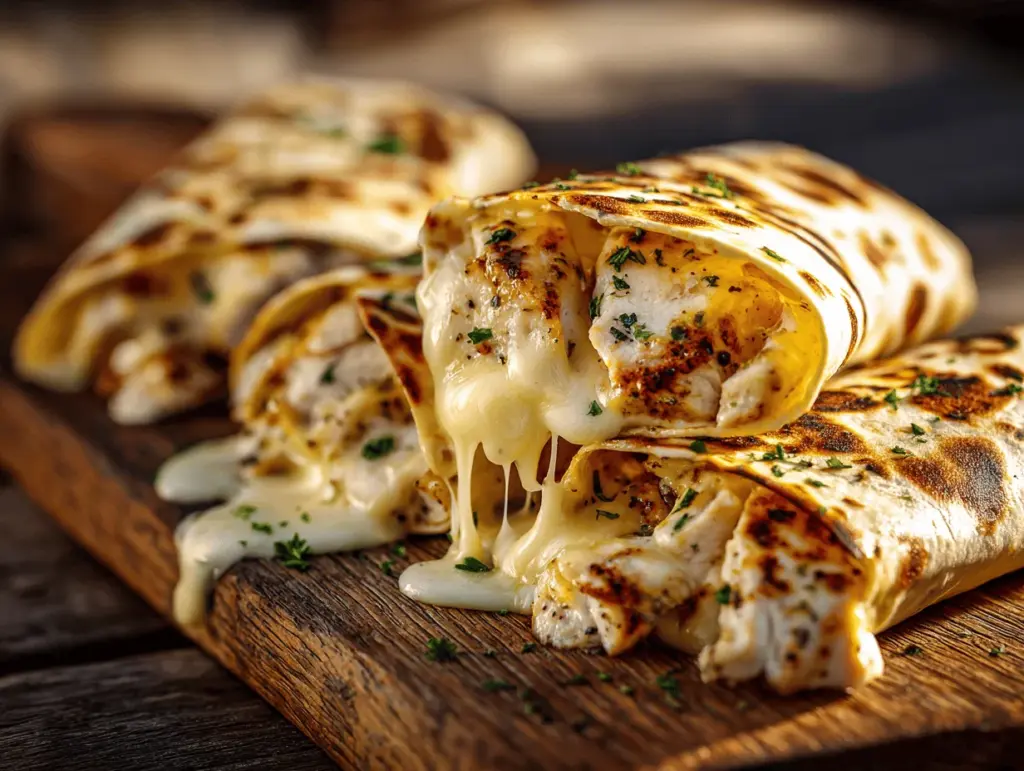
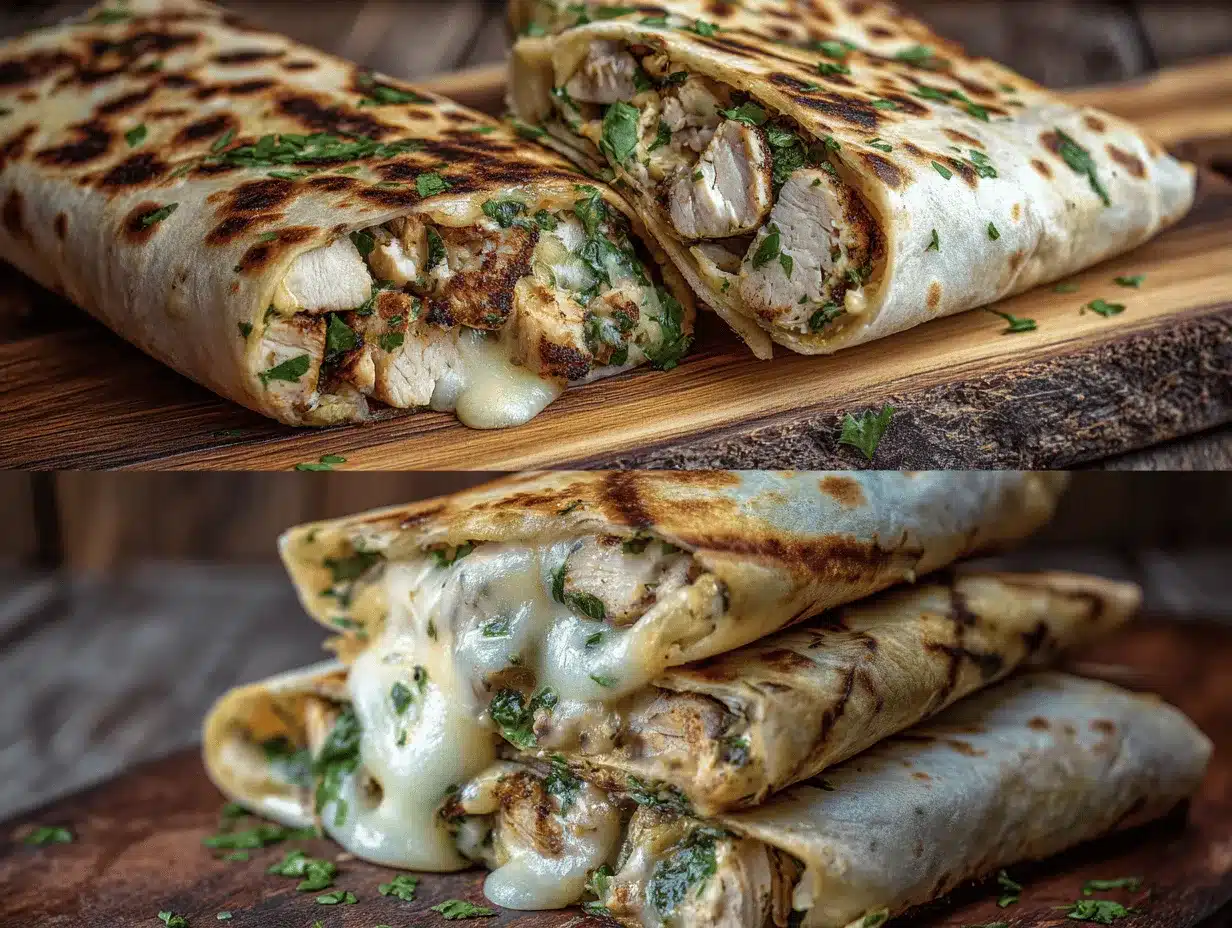
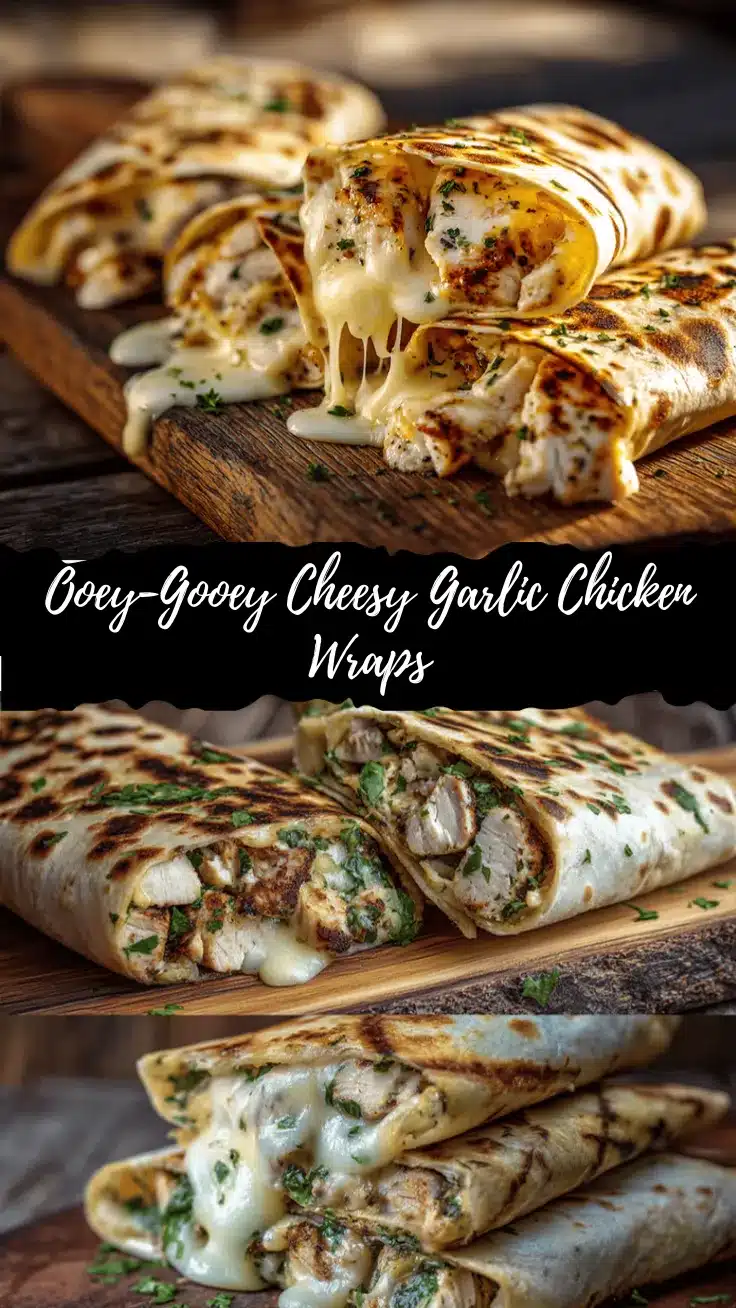
The smell of bubbling cheese and roasted garlic wafting through my kitchen always makes me stop in my tracks. I remember the first time I put together these cheesy garlic chicken wraps—it was a chilly Friday, my husband and I were both exhausted, and I wanted something easy, hearty, and just a bit indulgent. You know those days when you crave a cozy dinner, but takeout just doesn’t sound right? That’s exactly how these wraps were born.
There’s something magical about cheese melting into juicy chicken, all tucked inside a golden, crispy tortilla. Honestly, cheesy garlic chicken wraps are the kind of meal that feels like a treat but comes together with almost no effort—just what you want when you’re cooking for two and don’t want a mountain of dishes. I’ve tested different cheeses, tried flour and whole wheat wraps, and even played around with the garlic (fresh, roasted, powder—trust me, I’ve done it all).
These wraps are a little bit of everything: comforting, ooey-gooey, and garlicky enough to make your taste buds sing. If you’re looking for a dinner that’s quick (hello, 25-minute meal!), easy to customize, and guaranteed to make both of you smile, this is it. Perfect for date nights, Netflix marathons, or even just a regular Tuesday when you want something special. Cheesy garlic chicken wraps have become a staple in my kitchen, and I can’t wait to share all my tips and tricks so you can make your own irresistible version at home!
Why You’ll Love This Recipe
I’ve made these cheesy garlic chicken wraps more times than I can count, and every single time, they’re a hit. Here’s why you’re going to fall head over heels for this easy dinner for two:
- Quick & Easy: The whole recipe comes together in under 30 minutes, so you’re not stuck in the kitchen all night. It’s honestly faster than waiting for delivery!
- Simple Ingredients: No need to hunt down fancy stuff. Most of these things are probably already hanging out in your fridge or pantry.
- Perfect for Cozy Nights: Whether you’re planning a movie night or just want a comforting meal, these wraps deliver serious feel-good vibes.
- Crowd-Pleaser (Even for Two!): I’ve served these to picky eaters, cheese lovers, and even my “not-so-sure-about-garlic” friend—everyone raves!
- Unbelievably Delicious: The garlic butter, gooey cheese, and juicy chicken are a match made in heaven. Every bite is melty, savory, and packed with flavor.
What really sets my cheesy garlic chicken wraps apart from the rest? It’s the little things—like mixing fresh and roasted garlic for extra depth, using a blend of cheeses for that ultimate pull-apart gooeyness, and toasting the wraps in a skillet until they’re perfectly crisp. I also love how easy it is to switch things up (think: spicy jalapeños, smoky BBQ sauce, or even a handful of spinach for a little green boost).
This recipe isn’t just another wrap—it’s the one you’ll crave when you need a little comfort. It’s the kind of meal you remember, because it’s not just filling, it’s fun. And let’s face it, when dinner makes you grin after the very first bite, you know you’re onto something good!
Ingredients Needed
This cheesy garlic chicken wraps recipe is all about simple, flavorful ingredients coming together for maximum deliciousness—with zero fuss. If you’re like me, you probably have most of these on hand already. Here’s what you’ll need:
- Chicken Breast or Thighs (8 oz / 225g, cooked and shredded or diced): Go for boneless, skinless chicken for easy prep. I usually poach or sauté mine, but rotisserie chicken works like a charm, too.
- Large Flour Tortillas (2, 10-inch / 25cm): Whole wheat or gluten-free wraps also work—just make sure they’re sturdy enough to hold all that filling.
- Mozzarella Cheese (1 cup / 100g, shredded): Gives you that classic ooey-gooey cheese pull. I love using a low-moisture block and shredding it myself for best melt.
- Sharp Cheddar Cheese (1/2 cup / 50g, shredded): Adds a punch of flavor and color. You can sub in Monterey Jack or Colby if you want something milder.
- Garlic (2 cloves, minced): Fresh garlic brings the best flavor, but you can use 1/2 tsp garlic powder in a pinch.
- Butter (2 tbsp / 28g, melted): For brushing and infusing the wraps with garlicky goodness. If you’re dairy-free, olive oil works, but real butter really makes it sing.
- Italian Seasoning (1/2 tsp): Optional, but highly recommended for that herby, savory kick.
- Salt & Black Pepper (to taste): Season your chicken and cheese mix well. Good seasoning = great wraps.
- Fresh Parsley (2 tbsp, chopped): For garnish and a little pop of green. Totally optional, but so pretty for serving.
Optional add-ins:
- Red pepper flakes: For a little heat.
- Chopped baby spinach or arugula: Sneak in some greens.
- Sliced jalapeños or roasted red peppers: For extra zing.
Substitution notes: If you’re out of mozzarella, try provolone or fontina. Swap in a plant-based cheese for a dairy-free version, or use leftover turkey or even tofu for the filling. I’ve tried them all—each one brings its own little twist!
Equipment Needed
Let’s keep it simple—you don’t need a fancy kitchen to make these cheesy garlic chicken wraps. Here’s what I always reach for:
- Large Skillet or Nonstick Frying Pan: For crisping up your wraps. Cast iron is my favorite for extra crunch, but any nonstick pan works.
- Mixing Bowl: To toss together the chicken, cheese, and seasoning.
- Small Microwave-Safe Bowl: For melting the butter and infusing it with garlic.
- Tongs or a Wide Spatula: Helps with flipping wraps without making a mess.
- Sharp Knife & Cutting Board: For chopping chicken and herbs.
- Grater: If you’re shredding your own cheese (which I always recommend for best melt).
- Pastry Brush (optional): For brushing the garlic butter onto the wraps. If you don’t have one, just use the back of a spoon.
Budget tip: If you don’t have a cast iron pan, no worries—a regular nonstick or stainless pan will do. I’ve even used a sandwich press in a pinch, and it worked great! Just be sure to keep an eye on the wraps so they don’t burn. If you’re using a cheese grater, rinse it right after—melted cheese can really stick if you leave it too long!
Preparation Method
- Cook the Chicken (if not using leftovers):
Time: 10-12 minutes
Season an 8 oz (225g) boneless, skinless chicken breast or thighs with salt and pepper. Sauté in a skillet with a drizzle of oil over medium heat for 5-6 minutes per side, until fully cooked and juices run clear. Let cool slightly, then shred or dice. - Melt the Garlic Butter:
Time: 1 minute
In a small microwave-safe bowl, melt 2 tbsp (28g) butter. Stir in 2 cloves minced garlic (or 1/2 tsp garlic powder) and 1/2 tsp Italian seasoning. Set aside—you want that flavor to bloom! - Mix the Filling:
Time: 2 minutes
In a mixing bowl, combine the cooked chicken, 1 cup (100g) shredded mozzarella, 1/2 cup (50g) sharp cheddar, a pinch of salt, black pepper, and any optional add-ins (like spinach or jalapeños). Toss until everything’s well coated in cheesy goodness. - Assemble the Wraps:
Time: 3 minutes
Lay out 2 large flour tortillas (10-inch / 25cm). Divide the cheesy chicken mixture evenly between them, spooning it onto the lower third of each tortilla. Fold in the sides, then roll up tightly like a burrito. - Brush with Garlic Butter:
Time: 1 minute
Brush the outsides of each wrap with the prepared garlic butter, making sure to get the seams (for extra flavor and crunch). - Toast the Wraps:
Time: 6-8 minutes
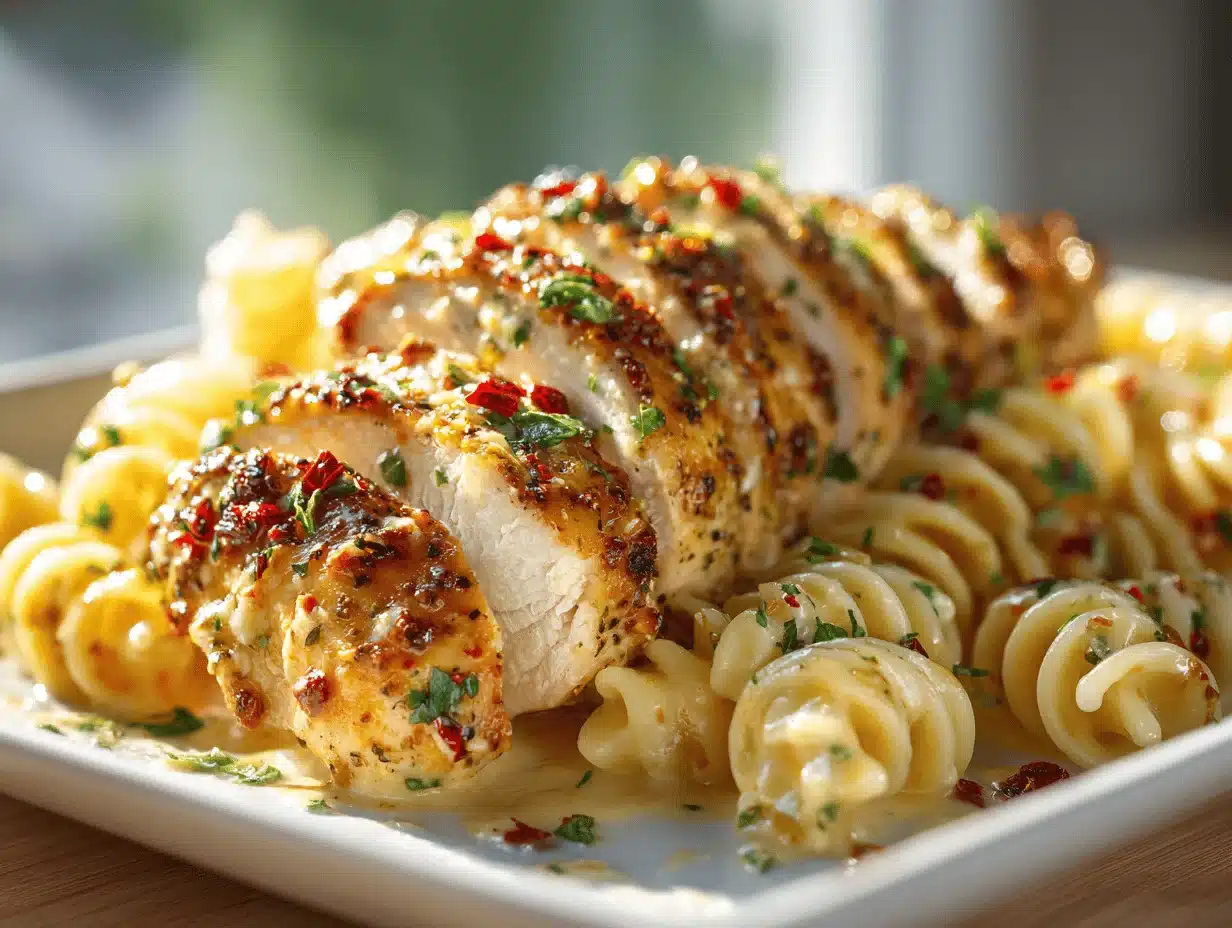
Heat your skillet over medium heat. Place the wraps seam-side down. Cook for 3-4 minutes per side, pressing gently with a spatula, until golden brown and crispy. If cheese oozes out, that’s a good sign (but keep an eye so nothing burns). - Slice and Serve:
Time: 1 minute
Let the wraps cool for 1-2 minutes (they’ll be hot!). Slice in half on the bias for that classic café look. Sprinkle with fresh parsley and serve warm.
Prep tip: If your wraps start to open, secure with a toothpick before toasting. Don’t overload the filling (been there, cheese everywhere!). Listen for a gentle sizzle when they hit the pan—that’s how you know the butter is doing its thing.
Troubleshooting: If the wrap isn’t browning, bump up the heat a little. If the filling isn’t melty, cover the pan with a lid for a minute to help the cheese melt faster. Don’t rush—crispy wraps need patience!
Cooking Tips & Techniques
Over time, I’ve learned a few tricks that really make these cheesy garlic chicken wraps shine:
- Use freshly shredded cheese: Pre-shredded cheese has coating that keeps it from melting smoothly. Shred your own for ultimate gooeyness!
- Don’t skimp on the garlic butter: It’s the secret to getting a crispy, flavorful wrap. If you want to amp up the garlic flavor, add a pinch of garlic powder to the butter.
- Low and slow for crispiness: Toast the wraps over medium (not high!) heat so they get golden and crisp without burning. I’ve rushed before, only to end up with a blackened outside and cold cheese inside—not fun.
- Seal the edges: After folding your wrap, press the seam down in the skillet and give it a minute to “seal.” This helps keep everything tucked in.
- Multitask smartly: While the chicken cooks, prep your cheese and garlic butter. It saves time and keeps everything moving smoothly.
- Trouble with sticking? If your skillet isn’t nonstick or well-seasoned, add a little extra butter or a spritz of oil before toasting.
- Consistency matters: If your filling is too dry, add a teaspoon of mayo or Greek yogurt. If it’s too wet, toss in a little more cheese.
Honestly, most of my kitchen fails have come from rushing the toasting step or using too much filling (it’s tempting, I know!). Less is more—packed wraps are harder to seal and flip.
Variations & Adaptations
The beauty of cheesy garlic chicken wraps? You can totally make them your own! Here are some fun twists I’ve tried (and loved):
- Spicy Southwest: Add 1/2 tsp chili powder, swap cheddar for pepper jack, and toss in some sliced jalapeños. Serve with salsa or avocado on the side.
- BBQ Chicken: Mix a tablespoon of your favorite BBQ sauce into the chicken before adding cheese. Swap parsley for green onions on top—so good!
- Veggie-Packed: Stir in a handful of sautéed mushrooms, spinach, or bell peppers. For a vegetarian version, use cooked beans or tofu instead of chicken.
- Low-Carb or Gluten-Free: Use low-carb tortillas or large collard greens as wraps. Try almond cheese if you’re dairy-free.
Personal favorite: When I want extra comfort, I toss a few thin slices of tomato inside before rolling up the wraps. The tomato gets warm and juicy, and it’s honestly irresistible!
For nut-allergy substitutions: Stick to regular tortillas (avoid almond flour wraps), and double-check your cheese labels for processing info.
If you’re experimenting with air frying, toast the wraps for 4-5 minutes at 375°F (190°C) for a super crispy exterior!
Serving & Storage Suggestions
I love serving these cheesy garlic chicken wraps fresh off the skillet, sliced in half and stacked on a plate with a sprinkle of parsley. They’re best piping hot, when the cheese is still gooey and stretchy (the ultimate cheese pull!).
Pair them with a crisp green salad, tangy pickles, or even a bowl of tomato soup—classic combos that make the meal feel extra special. A sparkling lemonade or chilled white wine goes perfectly, if you’re in the mood for a little treat.
Storing leftovers: Wrap any extras tightly in foil or plastic wrap and store in the fridge for up to 2 days. They reheat like a dream in a skillet over medium heat (about 3-4 minutes per side) or in a 350°F (175°C) oven for 10 minutes.
Freezing: These wraps freeze well! Just wrap tightly and freeze for up to 2 months. Thaw overnight in the fridge before reheating.
Flavor tip: The garlic and herbs get even more pronounced after a day in the fridge, so leftovers are seriously tasty. Just don’t microwave—they’ll get soggy!
Nutritional Information & Benefits
Each cheesy garlic chicken wrap (serving = 1 wrap) contains approximately:
- Calories: 480
- Protein: 32g
- Carbohydrates: 30g
- Fat: 25g
Chicken is a lean, high-protein base, great for muscle repair and keeping you full. The cheese adds calcium and flavor, while fresh garlic brings antioxidants and immune-boosting benefits. If you use whole wheat tortillas or add greens, you’ll sneak in extra fiber, too.
Dietary notes: Easily adapt this recipe to be gluten-free or low-carb by swapping tortillas. Contains dairy—use plant-based cheese if needed. As someone who aims for balanced meals, I love how this hits both the comfort factor and the protein goal!
Conclusion
If you’re searching for a dinner that’s easy, crave-worthy, and just a little bit special, these cheesy garlic chicken wraps should be at the top of your list. They’re quick enough for busy nights, cozy enough for date night, and versatile enough to suit just about any craving.
Don’t be afraid to play with the fillings or use what you have—this recipe is all about making it work for you. Every time I make these wraps, they remind me how good simple food can be (especially when cheese is involved!).
So give them a try tonight! Leave a comment below if you have a fun twist or a favorite cheese combo. Share this recipe with a friend who loves melty cheese, and don’t forget to snap a picture for Pinterest—you’ll want to remember that cheese pull!
Here’s to easy dinners, happy bellies, and making memories—one cheesy bite at a time!
FAQs
Can I use pre-cooked or rotisserie chicken in cheesy garlic chicken wraps?
Absolutely! Rotisserie chicken is a huge time saver. Just shred or dice and mix it with the cheese and seasonings.
What’s the best cheese for that ooey-gooey texture?
Mozzarella gives the best melt, but adding a bit of cheddar or Monterey Jack boosts the flavor and color. Shred your own cheese for the best results.
How do I keep the wraps from getting soggy?
Let the filling cool slightly before assembling and don’t overstuff. Toasting in a skillet helps crisp up the outside and seals in the gooey center.
Can I make cheesy garlic chicken wraps ahead of time?
Yes, assemble and refrigerate the wraps (un-toasted) up to 1 day ahead. Toast just before serving for the crispiest texture.
How do I make this recipe gluten-free or low-carb?
Use certified gluten-free tortillas or large lettuce/collard leaves for a low-carb option. Double-check your cheese and seasoning labels for hidden gluten if you’re sensitive.
Pin This Recipe!

Cheesy Garlic Chicken Wraps
- Total Time: 25 minutes
- Yield: 2 servings 1x
Description
These cheesy garlic chicken wraps are a quick, ooey-gooey, and comforting dinner for two, featuring juicy chicken, melty cheese, and garlicky butter all wrapped in a crispy tortilla. Perfect for cozy nights, date nights, or whenever you crave a hearty, easy meal.
Ingredients
- 8 oz boneless, skinless chicken breast or thighs, cooked and shredded or diced
- 2 large flour tortillas (10-inch)
- 1 cup shredded mozzarella cheese
- 1/2 cup shredded sharp cheddar cheese
- 2 cloves garlic, minced (or 1/2 tsp garlic powder)
- 2 tbsp butter, melted
- 1/2 tsp Italian seasoning (optional)
- Salt and black pepper, to taste
- 2 tbsp fresh parsley, chopped (for garnish, optional)
- Optional add-ins: red pepper flakes, chopped baby spinach or arugula, sliced jalapeños or roasted red peppers
Instructions
- Cook the chicken (if not using leftovers): Season chicken with salt and pepper. Sauté in a skillet with a drizzle of oil over medium heat for 5-6 minutes per side, until fully cooked. Let cool slightly, then shred or dice.
- Melt the garlic butter: In a small microwave-safe bowl, melt butter. Stir in minced garlic (or garlic powder) and Italian seasoning. Set aside.
- Mix the filling: In a mixing bowl, combine cooked chicken, mozzarella, cheddar, a pinch of salt, black pepper, and any optional add-ins. Toss until well mixed.
- Assemble the wraps: Lay out tortillas. Divide the cheesy chicken mixture evenly between them, spooning onto the lower third of each. Fold in the sides and roll up tightly.
- Brush with garlic butter: Brush the outsides of each wrap with the prepared garlic butter, especially the seams.
- Toast the wraps: Heat a skillet over medium heat. Place wraps seam-side down. Cook for 3-4 minutes per side, pressing gently, until golden brown and crispy.
- Slice and serve: Let wraps cool for 1-2 minutes. Slice in half on the bias, sprinkle with parsley, and serve warm.
Notes
For best results, shred your own cheese for ultimate meltiness. Don’t overfill the wraps to avoid spillage. If using gluten-free or low-carb tortillas, handle gently as they may be more delicate. Secure wraps with toothpicks if needed before toasting. Leftovers reheat best in a skillet or oven, not the microwave.
- Prep Time: 12 minutes
- Cook Time: 13 minutes
- Category: Main Course
- Cuisine: American
Nutrition
- Serving Size: 1 wrap
- Calories: 480
- Sugar: 2
- Sodium: 800
- Fat: 25
- Saturated Fat: 13
- Carbohydrates: 30
- Fiber: 2
- Protein: 32
Keywords: cheesy chicken wrap, garlic chicken wrap, easy dinner for two, skillet wrap, quick chicken recipe, comfort food, crispy tortilla, melty cheese, date night dinner, chicken and cheese wrap