The moment you crack open a tray of cheesy garlic butter bombs, you can practically hear the sizzle and smell the garlicky, buttery aroma wafting through the kitchen. It’s that kind of head-turning scent that gets everyone crowding around the oven, waiting for the first bite. Honestly, the first time I tried these cheesy garlic butter bombs, I was just aiming for a quick savory snack. But, wow—they turned out to be a family favorite, and now I make them for everything from movie nights to game day parties.
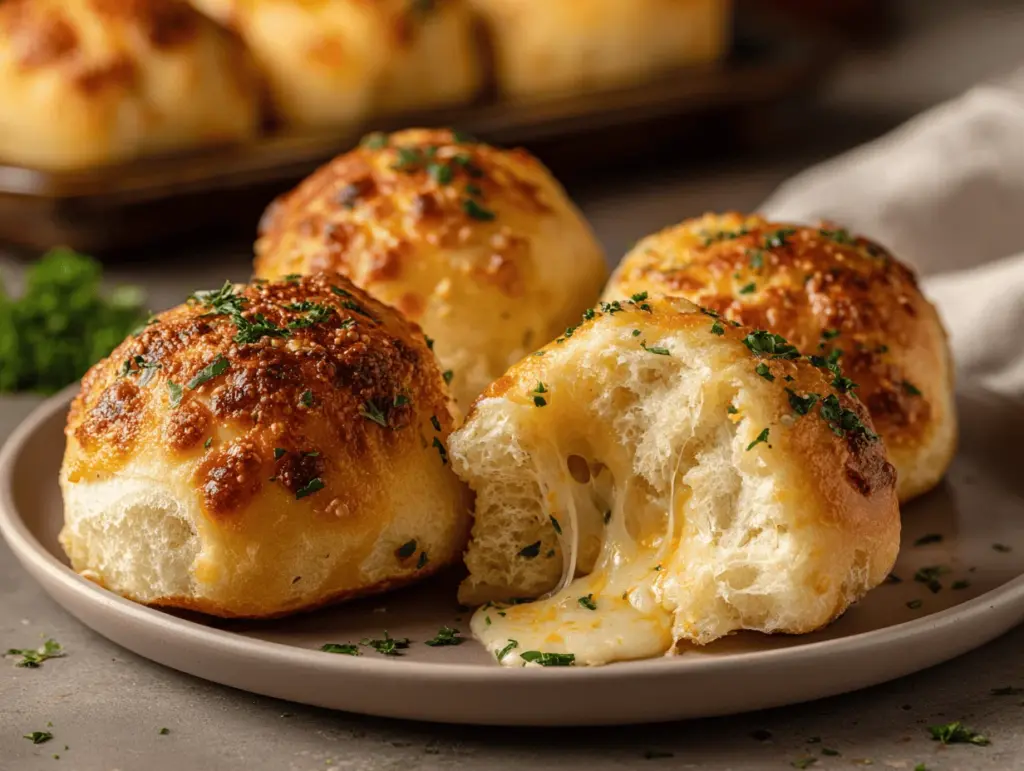
These cheesy garlic butter bombs are all about that glorious cheese pull. You know the one: gooey, melty mozzarella (or your favorite cheese) stretching between steaming bites of pillowy soft dough, all bathed in a rich, garlicky butter. I stumbled on this recipe during a rainy afternoon when I craved something a little indulgent, a little comforting, and a whole lot of fun to eat. After plenty of tweaking, I landed on a version that’s impossibly easy but tastes like you fussed for hours.
What I love most about making cheesy garlic butter bombs is how they bring everyone together. Whether you’re feeding a hungry group of kids, need a show-stopping appetizer for friends, or just want a treat to nibble on with soup, these always hit the spot. This recipe is perfect if you’re looking for an easy pull apart snack that’s savory, cheesy, and absolutely irresistible. Trust me—I’ve made these cheesy garlic butter bombs more times than I can count, and they never last long!
Why You’ll Love This Cheesy Garlic Butter Bombs Recipe
- Quick & Easy: These come together in about 25 minutes from start to finish—perfect for spontaneous cravings or last-minute guests.
- Simple Ingredients: No need to hunt for fancy stuff. Most of what you need is probably already in your kitchen!
- Perfect for Any Occasion: They’re a hit for parties, potlucks, Sunday brunch, or as a comforting snack during movie marathons.
- Crowd-Pleaser: Kids, teens, adults—everyone loves a warm, cheesy, garlicky treat that you can pull apart and share.
- Unbelievably Delicious: Imagine the golden, buttery crust, the garlicky aroma, and that gooey cheese center. It’s snack heaven, honestly.
What sets this cheesy garlic butter bombs recipe apart is the technique—wrapping cubes of cheese inside soft biscuit dough and brushing them with a homemade garlic butter sauce before AND after baking. It gives every bite extra flavor and that “wow” factor. Plus, you can use store-bought dough to keep things simple, or go all out and make your own if you’re feeling ambitious.
When I first made these, I didn’t expect them to become my go-to appetizer. But the moment my family started fighting over the last piece, I knew I had a winner. These cheesy garlic butter bombs are comfort food at its best—fast, easy, and dripping with flavor. They’re the kind of snack that makes you pause mid-bite, close your eyes, and just savor. If you want to impress without stress, or just turn an ordinary day into something special, this recipe is your secret weapon.
Ingredients Needed for Cheesy Garlic Butter Bombs
This cheesy garlic butter bombs recipe keeps things simple, using everyday ingredients that deliver big flavor. Here’s what you’ll need:
- For the Bombs:
- 1 can (16 oz/450g) refrigerated biscuit dough (or homemade dough, see below for tips)
- 16 small cubes of mozzarella cheese (about 1/2-inch/1.25cm each, or use your favorite melty cheese)
- For the Garlic Butter:
- 4 tablespoons (60g) unsalted butter, melted
- 3 garlic cloves, finely minced (or 1 teaspoon garlic powder if in a pinch)
- 2 tablespoons fresh parsley, chopped (or 1 tablespoon dried parsley)
- 1/4 teaspoon salt (adjust to taste)
- 1/4 teaspoon black pepper
- For Finishing (Optional):
- 1/4 cup (25g) grated Parmesan cheese (sprinkled on top for extra flavor)
- Crushed red pepper flakes (for a little heat, if you like)
Ingredient Notes & Swaps:
- Dough: I usually reach for the classic flaky biscuit dough in the refrigerated section, but homemade pizza dough or even crescent roll dough works great, too. (Homemade dough makes them extra special, but store-bought gets you snacking faster!)
- Cheese: Mozzarella gives the best “cheese pull,” but cheddar, Monterey Jack, or Gouda are all delicious. I’ve even used a mix of cheeses when cleaning out the fridge.
- Butter: Unsalted is best so you can control the saltiness, but salted works—just skip the added salt.
- Garlic: Fresh is unbeatable, but garlic powder totally works in a pinch. I’ve even used roasted garlic for a sweeter note.
- Parsley: Fresh adds a pop of color and flavor, but dried parsley is just fine for busy nights.
- Parmesan: Adds a nutty, salty finish—skip it if dairy-free or sub with nutritional yeast for a vegan twist.
I love that you can customize these based on what’s in your fridge. Once, I even tossed in a little cooked bacon and scallions for a loaded version—so good. Don’t be afraid to experiment or swap ingredients to fit allergies or dietary preferences!
Equipment Needed
- Baking Sheet: A standard rimmed baking sheet works, but you can also use a round cake pan for a pull-apart bread look.
- Parchment Paper or Silicone Baking Mat: For easy cleanup and to prevent sticking.
- Small Mixing Bowl: For melting butter and stirring in the garlic and herbs.
- Pastry Brush: Makes applying the garlic butter simple. (A spoon works in a pinch, though I find a brush gives better coverage.)
- Sharp Knife: For cutting cheese into cubes and opening biscuit dough.
- Measuring Spoons: To get your garlic and herbs just right.
I’ve made these cheesy garlic butter bombs with just the basics—a baking sheet and my hands! If you don’t have a pastry brush, use the back of a spoon to spread the butter. And for easy cleaning, parchment paper is your best friend. If you’re on a budget, dollar store baking sheets work just fine—just watch for hot spots and rotate halfway through baking.
How to Make Cheesy Garlic Butter Bombs – Step by Step

- Preheat the Oven:
Set your oven to 375°F (190°C). Line a baking sheet with parchment paper or a silicone mat.
(Tip: Preheating ensures even baking and a golden crust.) - Prepare the Garlic Butter:
In a small bowl, melt 4 tablespoons (60g) butter. Stir in 3 minced garlic cloves, 2 tablespoons parsley, 1/4 teaspoon salt, and 1/4 teaspoon black pepper. Set aside.
(If you love a stronger garlic kick, let the butter sit for a few minutes to infuse.) - Assemble the Bombs:
Open the biscuit dough and separate into 8 biscuits (if using 16 oz/450g can). Cut each in half to make 16 pieces. Flatten each piece into a 3-inch (7.5cm) circle.
Place a cheese cube in the center of each circle. Fold the dough around the cheese, pinching the seams tightly to seal. Roll gently between your palms to shape into balls.
(If the dough sticks, dust your hands with a little flour.) - Arrange on Baking Sheet:
Place the sealed bombs seam-side down on the lined baking sheet, about 2 inches (5cm) apart.
(If you want them to pull apart, place them close together in a round pan.) - Brush with Garlic Butter:
Generously brush each bomb with the garlic butter mixture. Reserve a bit for after baking. - Bake:
Bake in the preheated oven for 12-15 minutes, until the bombs are puffed and golden brown.
(Peek at 12 minutes—if they’re browning too fast, tent loosely with foil.) - Add Final Touches:
Remove from oven and immediately brush with remaining garlic butter. Sprinkle with Parmesan cheese and a pinch of red pepper flakes if you like.
(The sizzle when the butter hits the hot bread is pure magic!) - Cool Briefly & Serve:
Let cool for 2-3 minutes (the cheese will be hot!). Serve warm and enjoy that gooey cheese pull!
Personal Note: If you ever notice a bit of cheese leaking out, don’t worry—it just means someone’s getting an extra crispy, cheesy edge. That’s a bonus in my book!
Pro Cooking Tips & Techniques
- Seal Tightly: Make sure to pinch the dough well around the cheese. If the seal is loose, cheese will leak (learned that the hard way—messy but still delicious!).
- Don’t Overstuff: It’s tempting to cram in extra cheese, but too much makes sealing tricky and causes more leaks. Stick to about 1/2-inch (1.25cm) cubes for best results.
- Even Baking: Arrange the bombs with enough space between them if you want individual snacks, or snuggle them close for pull-apart bread. Rotate the pan halfway through if your oven runs hot in spots.
- Infuse Butter: If you’re a garlic superfan, let the garlic sit in melted butter for 10 minutes before brushing—more flavor!
- Timing is Key: Remove bombs from the oven as soon as they’re golden, not brown, to keep them soft and fluffy.
- Multitasking: While the bombs bake, prep a dipping sauce or chop some fresh herbs for garnish. Makes you look like a pro and maximizes kitchen time.
- Don’t Stress Over Perfection: If a few bombs burst or brown unevenly, just call them “rustic.” They’ll still disappear in minutes!
I’ve made these with both store-bought and homemade dough. Homemade takes a bit longer but gives you total control over flavor and texture. If you’re short on time, don’t feel bad about using the can—honestly, nobody will complain once they taste these cheesy garlic butter bombs.
Variations & Adaptations
- Gluten-Free: Use your favorite gluten-free biscuit or pizza dough. I’ve tried with Cup4Cup blend and it works beautifully—just handle gently to avoid crumbling.
- Herb & Spice Twist: Add 1/2 teaspoon Italian seasoning or a pinch of smoked paprika to the garlic butter for an extra flavor punch. Swap parsley for basil or chives for a fresh spin.
- Loaded Bombs: Tuck in a bit of cooked bacon, chopped jalapeños, or sun-dried tomatoes with the cheese for a surprise in every bite.
- Dairy-Free: Go for dairy-free cheese and plant-based butter. I’ve made these with vegan mozzarella and honestly, they’re still so satisfying!
- Sweet & Savory: For a brunch twist, use brie and a spot of fig jam inside the dough. It’s unexpected and ridiculously good.
- Air Fryer Method: Want to skip the oven? Air fry at 350°F (175°C) for 7-9 minutes until golden and melty inside. Works great for small batches!
My personal favorite is adding a spoonful of caramelized onions with the cheese. It takes these cheesy garlic butter bombs into gourmet territory without much extra work. Don’t be afraid to get creative—this recipe is super forgiving!
Serving & Storage Suggestions
- Serve Warm: These cheesy garlic butter bombs are best straight from the oven, when the cheese is gooey and the tops glisten with garlic butter.
- Presentation: Pile onto a rustic breadboard or arrange in a circle for a pull-apart centerpiece. Sprinkle extra parsley or Parmesan on top for a pop of color.
- Pairings: Serve with marinara sauce, ranch, or garlic aioli for dipping. They’re also amazing alongside soups, salads, or even as a side for pasta.
- Storing: Let leftovers cool completely, then store in an airtight container in the fridge for up to 3 days.
- Freezing: Place cooled bombs in a freezer bag, squeeze out extra air, and freeze for up to 2 months. Thaw overnight in the fridge before reheating.
- Reheating: Warm in a 350°F (175°C) oven for 6-8 minutes or pop in the air fryer for 2-3 minutes. Microwave works in a pinch, but the crust won’t be as crisp.
The flavors actually deepen after a day—leftover bombs make a killer lunchbox treat or midnight snack. Just be sure to reheat gently so the cheese gets melty again!
Nutritional Information & Benefits
- Estimated per Bomb (1 of 16): 110 calories, 6g fat, 11g carbohydrates, 4g protein, 1g sugar
- Key Benefits:
- Good source of protein from cheese
- Calcium boost for bone health
- Can be adapted for low-carb or gluten-free diets with appropriate swaps
- Dietary Notes: Contains dairy, wheat, and may contain eggs depending on dough brand. Easily adjusted for allergies—use gluten-free dough or dairy-free cheese as needed.
Honestly, I love that you can sneak in extra herbs or even swap in whole wheat dough for more fiber. They’re indulgent but can absolutely fit into a balanced, feel-good snack routine.
Conclusion
If you’re craving something cheesy, garlicky, and absolutely addictive, these cheesy garlic butter bombs are your answer. Whether you’re feeding a crowd or treating yourself to a cozy snack, this recipe is guaranteed to bring smiles (and requests for seconds!). The pull-apart, gooey cheese center and golden garlic butter crust make every bite pure comfort.
Feel free to make these your own—mix up the cheese, toss in your favorite herbs, or even sneak in a little extra spice. That’s the beauty of this easy pull apart snack: it’s totally customizable and always delicious. Personally, these bombs remind me of fun nights with friends and family, everyone grabbing for “just one more.”
Go ahead—give this cheesy garlic butter bombs recipe a try! If you love it, let me know in the comments, share your own twists, or tag your creations. I can’t wait to see your cheesy masterpieces. Happy snacking, and don’t forget to savor that first warm, melty bite!
Frequently Asked Questions
How do I stop the cheese from leaking out of my garlic butter bombs?
Make sure you pinch the dough tightly around the cheese so there are no gaps. If a little cheese sneaks out, it’ll just crisp up on the edges—still delicious!
Can I make these cheesy garlic butter bombs ahead of time?
Absolutely! Assemble and refrigerate uncooked bombs for up to 24 hours. Bake fresh when you’re ready, or freeze before baking (add a few extra minutes to the baking time if frozen).
What’s the best cheese to use for maximum “cheese pull”?
Mozzarella is hands-down the best for that gooey stretch, but you can mix in cheddar, fontina, or provolone for extra flavor.
Can I use pizza dough instead of biscuit dough?
Yes! Pizza dough works great—just roll it a bit thinner before wrapping the cheese. The texture will be chewier but still totally delicious.
Are these garlic butter bombs freezer-friendly?
Yes, they freeze beautifully. Let them cool, pop into a freezer bag, and freeze up to two months. Reheat in the oven or air fryer for best results.
Pin This Recipe!


Cheesy Garlic Butter Bombs
- Total Time: 25 minutes
- Yield: 16 bombs 1x
Description
These Cheesy Garlic Butter Bombs are an easy, pull-apart snack featuring gooey mozzarella cheese wrapped in soft biscuit dough and brushed with garlicky butter. Perfect for parties, movie nights, or as a comforting appetizer, they’re quick to make and always a crowd-pleaser.
Ingredients
- 1 can (16 oz) refrigerated biscuit dough (or homemade dough)
- 16 small cubes mozzarella cheese (about 1/2-inch each, or your favorite melty cheese)
- 4 tablespoons unsalted butter, melted
- 3 garlic cloves, finely minced (or 1 teaspoon garlic powder)
- 2 tablespoons fresh parsley, chopped (or 1 tablespoon dried parsley)
- 1/4 teaspoon salt
- 1/4 teaspoon black pepper
- 1/4 cup grated Parmesan cheese (optional, for topping)
- Crushed red pepper flakes (optional, for topping)
Instructions
- Preheat oven to 375°F (190°C). Line a baking sheet with parchment paper or a silicone baking mat.
- In a small bowl, melt the butter. Stir in minced garlic, parsley, salt, and black pepper. Set aside.
- Open the biscuit dough and separate into 8 biscuits. Cut each in half to make 16 pieces. Flatten each piece into a 3-inch circle.
- Place a cheese cube in the center of each dough circle. Fold the dough around the cheese, pinching the seams tightly to seal. Roll gently into balls.
- Arrange the sealed bombs seam-side down on the prepared baking sheet, about 2 inches apart.
- Brush each bomb generously with the garlic butter mixture, reserving some for after baking.
- Bake for 12-15 minutes, until puffed and golden brown.
- Remove from oven and immediately brush with remaining garlic butter. Sprinkle with Parmesan cheese and red pepper flakes if desired.
- Let cool for 2-3 minutes before serving. Enjoy warm.
Notes
Seal the dough tightly around the cheese to prevent leaks. For extra flavor, let the garlic sit in melted butter for 10 minutes before brushing. Customize with different cheeses, herbs, or add-ins like bacon or jalapeños. These can be made gluten-free or dairy-free with appropriate substitutions. Air fryer method: cook at 350°F for 7-9 minutes.
- Prep Time: 10 minutes
- Cook Time: 15 minutes
- Category: Appetizer
- Cuisine: American
Nutrition
- Serving Size: 1 bomb
- Calories: 110
- Sugar: 1
- Sodium: 220
- Fat: 6
- Saturated Fat: 3
- Carbohydrates: 11
- Protein: 4
Keywords: cheesy garlic butter bombs, pull apart snack, easy appetizer, mozzarella bombs, garlic bread bites, party snack, game day food